
Water separators are important devices to ensure that any water existing in the air stream is removed to protect downstream equipment such as air tools from damage. Water moisture is an inevitable byproduct of compressed air, and so, it’s necessary to have equipment installed that will help to remove the water.
Water separators are small devices that are easy to install, but I see a lot of questions poised across the internet of air compressor users wondering how to make their own water separators.
Well, fear no more… this article will provide you with all the relevant information on the equipment you need and how to create a DIY water separator, along with additional options.
Table of Contents
- Homemade Air Compressor Water Separator Equipment
- How to Make a Water Separator for Air Compressor
- Homemade Air Compressor Water Trap Alternative Options
- FAQs (Frequently Asked Questions)
Homemade Air Compressor Water Separator Equipment
To be able to create your own air compressor water separator setup, you first will need to ensure you have all the correct tools and equipment ready to make this airline water trap! Here is a list of material and equipment you will need for this DIY water trap for air compressor:
- PTFE tape
- Soldering flux
- Solder strand
- Propane torch
- 1 x 2 ½“ to ¾” brass nipple
- 1 x ¾” Brass street elbow (with male and female end)
- 1 x ¾” threaded male adapter
- 1 x ¾” compressed air hose
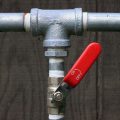
- 1 x ¾” threaded brass ball valve (with both female ends)
- 1 x ¾” Brass compression fitting (for the regulator)
- 1 x ¾” Rapid air NPT filter regulator
- 3 x ½“ threaded ball valves (with both female ends)
- 3 x ¾” – ½“ male adapters
- 3 x ¾” copper Tee
- 6 x ¾” copper pipes (Type L ) cut in 72” for the height
- 9 x ¾” Copper pipe in 2-inch pieces
- 10 x ¾” copper elbow (90 degrees)
Of course, this is a list of equipment for just one method of creating a DIY water separator, and you may wish to take a different approach using slightly different equipment, different sizes, etc. We will discuss additional options later in this article.
The first four items in the list are for the joining process (soldering) of the copper pipe. The addition of the soldering flux is essential in this method as it will ensure that the copper pipe doesn’t get oxidized when it is heated by the propane torch.
How to Make a Water Separator for Air Compressor
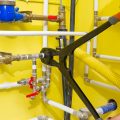
Now we have all the equipment ready to go, let’s go through these 9 steps into making a homemade water separator air compressor:
- First of all, start by joining 3 x 2-inch copper pipes with 1 x 90-degree copper elbow on each end. It’s important here to apply a light coat of the soldering flux inside the copper elbow and on the outer side of the pipe before fitting them together to restrict oxidation.
- Then take 3 x 2-inch copper pipes and fix 1 x copper tee on each one of them before adding the leftover copper elbows on the other end of every copper pipe.
- You should now only have 3 x 2-inch pipes unused, so take the joint with the copper tee and join each pipe, with the second 2-inch pipe being the one joined to the copper tee.
- Using 5 x pipes, attach the joint with the copper tee to 2 x 72″ type L copper pipes. It’s important that one of your joints should only be joined to a single long pipe, so ensure you attach that one on the side of the structure with the copper elbow.
- Next take the other joints and attach them to the other side of the type L copper pipes in a way that ensures there’ll be a continuous flow of air throughout the chambers. 1 x of these joints will be attached to a single pipe.
- Time to solder the joints using the propane torch and solder to ensure that the pipes are air tight and don’t leak. To do so, you will need to heat the pipes on the joints and then melt the solder on the pipe once it’s hot enough. A good gauge of a suitable temperature is when the flame on the pipe turns green. The solder will then be sucked inside the tiny seam if the pipe is suitably hot.
- Fix the 3 x male adapters (3/4” -1/2”) on each outlet at the bottom of the system and then solder them to avoid leaks.
- Proceed to add the 3 x threaded 1/2” ball valves below the male adapters, using PTFE tape to create a secure threading.
- Now, cut the remaining 72-inch copper pipe into two halves and fix them on each side of the system. One side will be attached to the brass street elbow to go to the regulator, while the other side attaches to the compressed air hose coming from your compressor.
Homemade Air Compressor Water Trap Alternative Options
Some alternative options generally involve following a similar approach to the method described in this article for creating a homemade water separator air compressor but using different materials. The YouTube demonstration below provides a method of creating an air compressor water separator setup using PVC.
Well, it’s not recommended to use PVC for your airlines as they’re not rated for use with compressed air! Some good options you have include galvanized steel, stainless steel, and aluminum.
Besides the safety aspect of PVC potentially shattering under pressure, plastic does not transfer heat well (really poorly in fact). While copper transfers heat better than steel out of the hot air to condense the water vapor but are far more expensive to use for this build.
All the materials will have different joining methods than copper, making it quicker and easier for you to create your setup, however, they are likely to be more expensive to purchase.
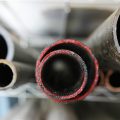
Another material you should avoid using is an iron pipe, as they will corrode pretty fast inside, which will badly affect the quality of your compressed air. The YouTube demonstration below opts for steel as it is cheap and easy to weld.
Using plastic pipes is another alternative to the more corrosive metals. Plastic will offer your water separator system several benefits. Where metals may suffer corrosion over time, plastic certainly will not. Because they will not corrode, there is no need to worry about rust getting into your airstream. It also lessens the chance of blockages.
The inside of plastic pipes will never deteriorate. They will remain smooth and clean, which supports uninterrupted airflow. Because plastic is not a heavy material, it is easy to carry around compared to metal. You only need simple tools to cut plastic, and it does not take a lot of effort to do so.
I already said PVC was a big no-no, but you have other options that are safe and approved for compressed air water separator piping. These include:
- ABS
- Polyethylene
- High-density Polyethylene
These materials are all oil-resistant meaning that compressor lubricant will not cause any of them to degrade. Polyethylene is a type of plastic designed just for piping systems for compressed air. Each of these materials will work perfectly in your water separator.
FAQs (Frequently Asked Questions)
It’s impossible to “keep” water out of your air compressor, as moisture is an inevitable byproduct of air compression. But, what you can do is limit/reduce it as much as possible by installing water separators and air dryers. On top of this, you can drain the air compressor tank regularly or after every use to be sure. Water can have damaging effects on your system so it is important to control it.
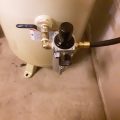
A water trap is a simple method of removing water, designed to work with incoming cool air. The air enters one side, and then it circulates around the bowl where the water collects at the bottom of the trap and drains out. The air will exit through a filter, which traps other impurities in the air.
A lot of people swear by water separators being absolutely mandatory for compressed air applications. Without a water separator, water moisture could travel down your airlines, causing damage to the system and air tool connected at the end of the line. If water is not removed from an air compressor, it can lead to corrosion, which then results in the flaking of pipes, further contaminating the system.
Ideally, the water separator should be installed after the air receiver tank, or as close to the outlet of the air compressor as possible. This will allow for the immediate removal of water from the air before the air is forced downstream to power your pneumatic devices.
Please comment below if you have any questions about making a DIY water separator for your air compressor!
Related posts:
 Can I Use PEX For Compressed Air? Ultimate Guide To PEX Pipe
 Best Pipe for Air Compressor Lines – Pipe Materials or Air Line Plumbing Guide
 Compressed Air Oil Separators & Water Separators – How They Work & Why You Need Them
 Practical Guide to Running Air Compressor Lines in Garage Workshop
 Galvanized vs Black Pipe – Using for Compressed Air, Water & More