
This page is Replacing A Compressor Pressure Switch too. It’s page two of the step-by-step procedure we used to replace the pressure switch on one of our air compressors.
If you want to read these instructions from the beginning, here’s page one of replacing a pressure switch.
We left off on the previous page with all wires removed from the pressure switch, the wire sets visible laying on top of the compressor tank both with the remaining strain relief fittings still on the wire sets, and which will be removed due to the design of the new pressure switch.
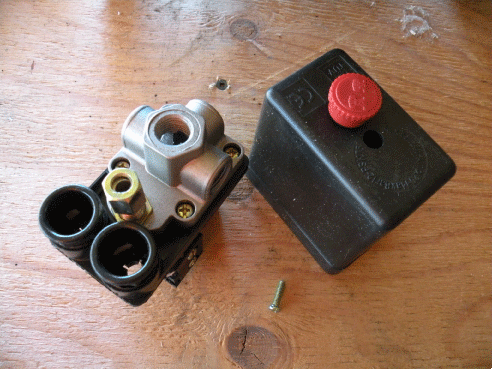
The image above is the new pressure switch, cover off, and with the guts of the pressure switch upside down to display the manifold base, the compression fitting for the unloader valve, and to the left, the two strain relief fittings. In the replacing the switch sequence, one wire set from the power cord will be inserted through one of the two strain relief fittings, and the other wires from the motor will be inserted through the other strain relief. We”ll get to that in just a bit.
Time to install the new pressure switch.
First, you will want to thread the manifold onto the male nipple on the tank.
In the image below the manifold is resting on the compressor tank, with the port that is threaded onto the tank nipple on the right. The tank nipple thread has been coated with pipe dope, a thread sealing method we prefer over the use of plumber’s tape. Use whichever you wish. Just make sure that no tape or pipe dope is allowing to sit inside the air path, or it might get blown into a sensitive area and cause problems downs the road.
You will thread the manifold base onto the tank nipple tightly, but not too tight as that will crack the casting, until the manifold ports come to rest facing the front handle of the air compressor. In this position the unloader valve attachment port will be in the middle, and the two strain relief fittings will be on the pump side of the compressor.
After threading the pressure switch onto the tank nipple, we would suggest that the next item to connect is the unloader valve.
Connecting the Unloader Valve
We have a confession to make. One of the things that we found most difficult about replacing the pressure switch was getting the unloader valve tube connected properly. Here’s why.
As noted earlier, we used a different style pressure switch. Instead of the unloader valve connection being on the side of the pressure switch, the new switch had the unloader valve connection on the bottom.
Have a look at this next image to see what manually trying to reshape the unloader valve tube does to that tube!
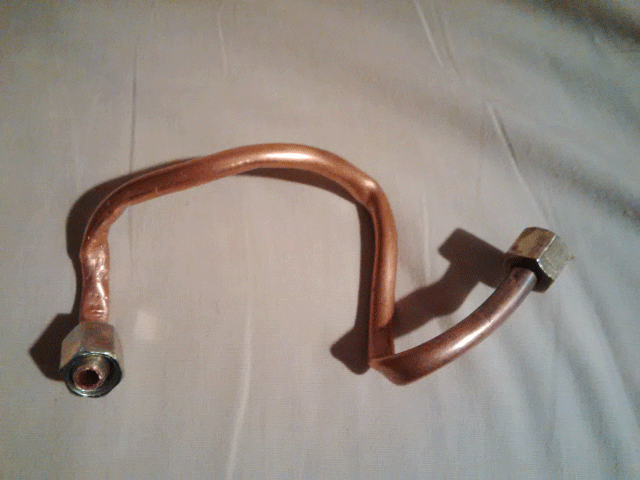
Man, these things are a witch to reshape. And further, since the unloader valve attachment is now on the bottom of the pressure switch, it’s really a nit-picking job to try to connect the line what with things being in the way. We resolved this issue, and you’ll see how in the upcoming images.
We’ve always been a bit frivolous when telling you to simply pop into any good plumbing store for fittings for your compressor. Well, we visited a lot of really good plumbing stores, and managed to find some that had fittings of the right size, but most plumbing outlets do not. They cater to the 1/2″ NPT and 1/2″ copper sizes, and up. We almost could not locate any 1/8″ NPT fittings, which we needed.
We also suggest, and this little experience of ours confirms it, to find and get friendly with your local industrial compressed air valve and cylinders distributors. You see, if they are selling air valves and air cylinders, they will have reams of fittings to connect and interconnect various air components. They are also a good source of air treatment equipment, but that’s for another page.
So off to the industrial distributor shop we trundled, and in sort order, acquired:
- 1 – 1/8″ NPT elbow with female on one side and male thread on the other – in brass
- 2 – 1/8″ female NPT instant-style straight fittings with a 1/4″ tube size
- 1 – 1/4″ – 1/8″ NPT reducing bushing
- about 1′ foot of t/4″ polyurethane tube (good for 200 PSI)
And here’s how we used them:

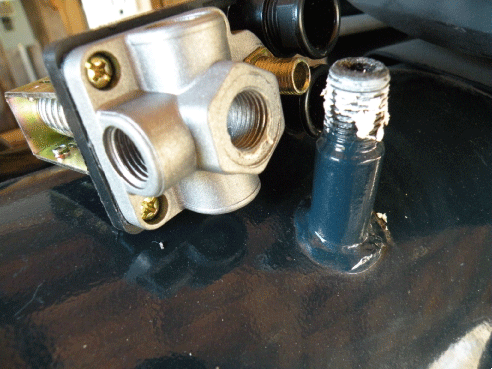
If you spot the white dots in the image above, one is on the instant fitting which is threaded onto the tank check valve fitting, and the other is the instant fitting threaded onto the 1/8″ brass elbow that we had threaded onto the unloader valve male thread under the pressure switch. Yes, we threaded the elbow onto the unloader valve fitting under the switch before we threaded the switch onto the tank nipple.
It was a matter of a few seconds to orient the polyurethane tube away from any heat sources since the tube is very easy to bend and it is resistant to kinking, unlike the copper tube.
We left the tube long as although you cannot see it from the image just above, the fitting on the pressure switch is just above and to the left of the fitting coming out of the tank check valve, and a straight tube connection between the two would likely have imparted a great sideload on the tube, possibly leading to a leak.
Now, we know that the air that flows from the pump into the tank can get very hot. And we are aware that the fitting into which the polyurethane tube is inserted on the tank check valve may get hot. If it does, we’ll have to find some high heat plastic 1/4″ tubing. It’s out there, but we’re not going to chase it down unless we have to, as our compressor use is sporadic and usually for short duration, so we suspect that heat will not be an issue for the now plastic unloader tube.
Here is the last page on replacing a compressor pressure switch.
Everbilt, compression brass sleeve, 1/4 in OD, is the ferrule that seals the tube that needs to be replaced. I got it at Home Depot, 3 for less than $2. My switch included the fitting and I reused the one to the tank with a new ferrule. Thanks for the clear and concise write up.
Thank you for the tip and you are welcome.
This was a great help
My compressor needed a refit so I purchased a new air line/fittings and guns only to find that as I took apart the pressure connections on the compressor it all fell apart
Easy enough I will get another switch oh no it’s not
There are so many different types and what are the connections for
Your article helped completely fix my machine
Thanks
Duncan
U.K.