
We recently had the need and stumbled through the process of, replacing a compressor pressure switch on one of our air compressors. This article will provide you with a full method on how to replace your air compressor pressure switch!
Air Compressor Pressure Switch
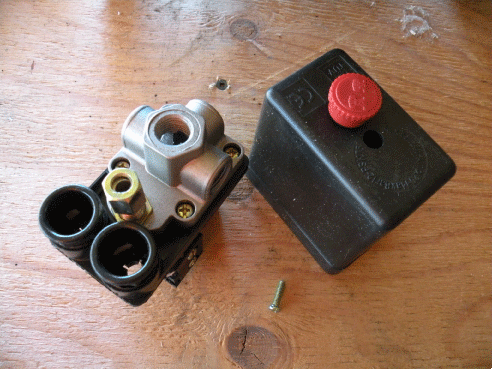
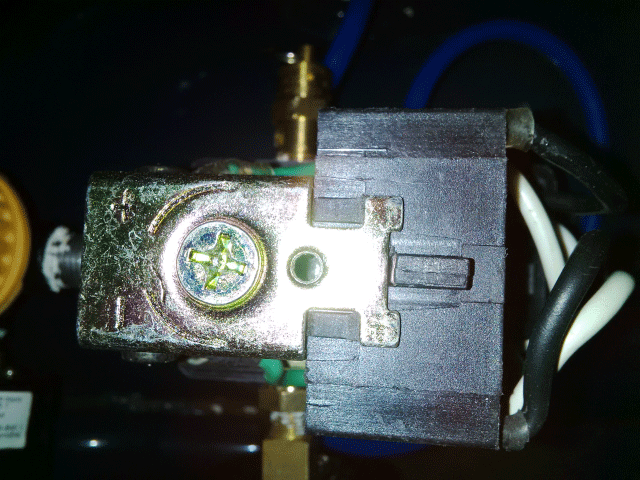
There was nothing wrong with the switch itself. The problem was that one of the fittings that entered the manifold base of the pressure switch had cracked the base, and it was continuously leaking. In removing the pressure switch to replace the base, we found that the base itself was part of the switch, meaning that we had to replace the pressure switch. Here’s what the disassembled pressure switch looked like after we had removed it from the compressor.
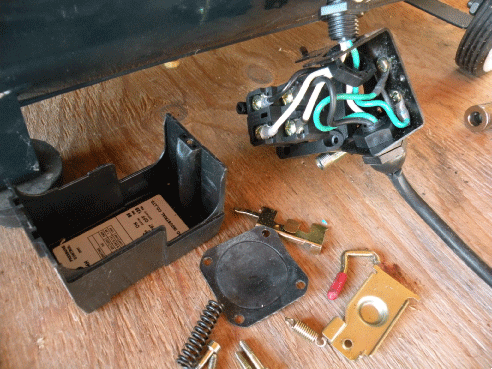
No, we are not interested in trying to reassemble this pressure switch. We expect the folks that build them are good at it, but the time it would take us would cost far in excess of what a new switch would cost, so we are obtaining a new one. Since the base is part of the switch and nowhere can you find a separate base, we would have to get a new switch anyway.
Replacing an Air Compressor Pressure Switch Guide
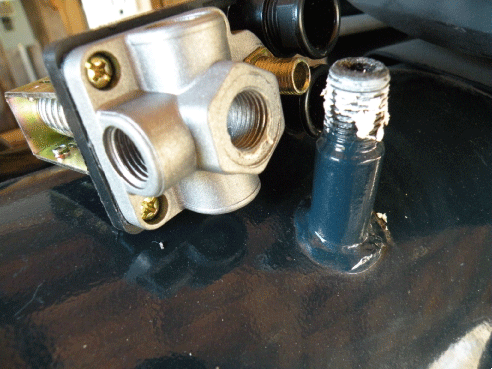
Here’s a look at the compressor with the switch removed. The fitting on the left is where the unloader valve line connects, and the vertical nipple on the right is where the pressure switch is mounted on this small DIY air compressor. The copper line sitting on the tank is the unloader line which connects from the tank fitting/tank check valve on the leftover to the unloader valve on the pressure switch itself.

Removing the Wires on the Old Air Compressor Pressure Switch
Now we want to remove the wires from the switch itself. There are two sets of wires. One set comes into the pressure switch from the motor, and the other set comes into the pressure switch from the supply side – the cord that you plug into the wall socket.
We continue by removing the various wires from the old pressure switch connections.
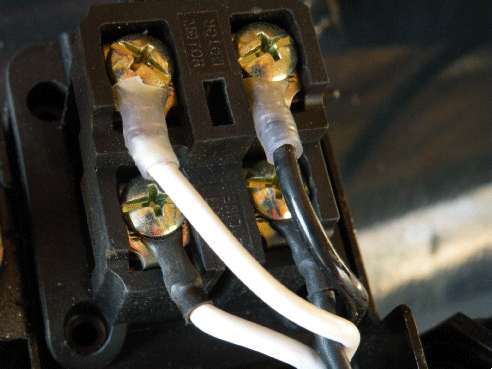
The power supply wires on this compressor are the black wire one of which comes from the cord to the plug, and the other is from the motor. The white wires, one from the power cord and the other from the motor circuit are the return wires.
The black and white terminal connections inside this switch are shown in the image above. When this switch trips, power flows on one of either sides of the switch, so, on this switch, both black wires are on one side, and both white on the other. As the switch works, alternatively, the black wires will be live or the white return wires will be live. Other switches may work differently, and you will need to read the terminal mounts to see what wire goes where.
The terminals will typically be marked motor or load. That’s where the wires from the compressor motor are attached. The other wire terminals may be marked supply or power and that’s where the wires from the power cord are attached.
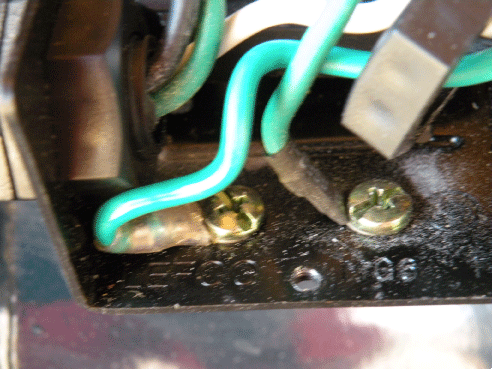
This next image is of the green wire mounting locations on this switch. The green wires are the ground wires and must be attached to a metal part of the pressure switch. One of these green wires is from the power cord and the other is from the motor wires. It doesn’t matter which green wire goes in which of these two spots in this pressure switch, as long as both wires are attached to the proper ground point.
Continue replacing the pressure switch by removing all of the wires from the old switch.
Part of doing that will mean that you will have to disassemble the strain relief fittings As the wires enter the pressure switch they are held in place by these strain relief fittings. These hold the wires securely to help prevent a disconnect should either wire be pulled on aggressively. Typically there is a plastic nut inside the switch housing that has to be removed, as is shown on the right in the image above unthreaded, and on the left, still threaded onto the strain relief fitting. Both plastic nuts will have to be removed.
The image below shows both wire sets – the ones from the power cord and the set from the motor circuit, removed from the pressure switch, and sitting on the compressor tank. You can see the rest of the strain relief fittings on both sets of wires.
We will have to remove the rest of the strain relief fittings from the two-wire sets. The reason is, we obtained a replacement pressure switch that has integral strain relief fittings.
The new one is also a pressure switch that has the unloader valve built into it, rather than having it hanging on the side of the switch as the old one had.
Installing the New Pressure Switch
The image above is the new pressure switch, cover off, and with the guts of the pressure switch upside down to display the manifold base, the compression fitting for the unloader valve, and to the left, the two strain relief fittings. In replacing the switch sequence, one wire set from the power cord will be inserted through one of the two strain relief fittings, and the other wires from the motor will be inserted through the other strain relief. We’ll get to that in just a bit.
First, you will want to thread the manifold onto the male nipple on the tank.
In the image below the manifold is resting on the compressor tank, with the port that is threaded onto the tank nipple on the right. The tank nipple thread has been coated with pipe dope, a thread sealing method we prefer over the use of plumber’s tape. Use whichever you wish.
Just make sure that no tape or pipe dope is allowed to sit inside the air path, or it might get blown into a sensitive area and cause problems downs the road.
You will thread the manifold base onto the tank nipple tightly, but not too tight as that will crack the casting, until the manifold ports come to rest facing the front handle of the air compressor. In this position, the unloader valve attachment port will be in the middle, and the two strain relief fittings will be on the pump side of the compressor.
After threading the pressure switch onto the tank nipple, we would suggest that the next item to connect is the unloader valve.
Connecting the Unloader Valve
We have a confession to make. One of the things that we found most difficult about replacing the pressure switch was getting the unloader valve tube connected properly. Here’s why.
As noted earlier, we used a different style pressure switch. Instead of the unloader valve connection being on the side of the pressure switch, the new switch had the unloader valve connection on the bottom.
Have a look at this next image to see what manually trying to reshape the unloader valve tube does to that tube!
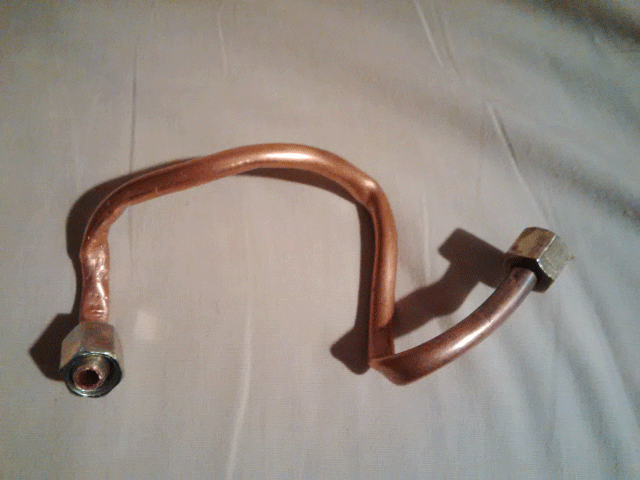
Man, these things are a witch to reshape. And further, since the unloader valve attachment is now on the bottom of the pressure switch, it’s really a nit-picking job to try to connect the line with things being in the way. We resolved this issue, and you’ll see how in the upcoming images.
We’ve always been a bit frivolous when telling you to simply pop into any good plumbing store for fittings for your compressor. Well, we visited a lot of really good plumbing stores and managed to find some that had fittings of the right size, but most plumbing outlets do not. They cater to the 1/2″ NPT and 1/2″ copper sizes, and up. We almost could not locate any 1/8″ NPT fittings, which we needed.
We also suggest, and this little experience of ours confirms it, to find and get friendly with your local industrial compressed air valve and cylinders distributors. You see, if they are selling air valves and air cylinders, they will have reams of fittings to connect and interconnect various air components. They are also a good source of air treatment equipment, but that’s for another page.
So off to the industrial distributor shop we trundled, and in sort order, acquired:
- 1 – 1/8″ NPT elbow with female on one side and male thread on the other – in brass
- 2 – 1/8″ female NPT instant-style straight fittings with a 1/4″ tube size
- 1 – 1/4″ – 1/8″ NPT reducing bushing
- about 1′ foot of t/4″ polyurethane tube (good for 200 PSI)
And here’s how we used them:

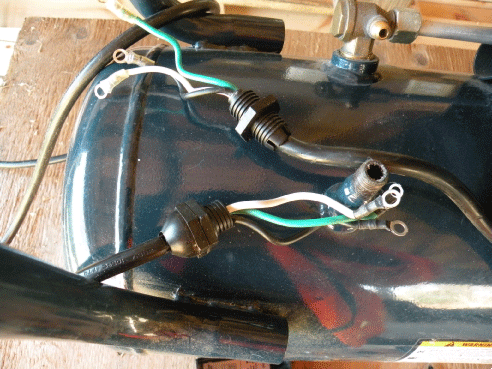
If you spot the white dots in the image above, one is on the instant fitting which is threaded onto the tank check valve fitting, and the other is the instant fitting threaded onto the 1/8″ brass elbow that we had threaded onto the unloader valve male thread under the pressure switch. Yes, we threaded the elbow onto the unloader valve fitting under the switch before we threaded the switch onto the tank nipple.
It was a matter of a few seconds to orient the polyurethane tube away from any heat sources since the tube is very easy to bend and it is resistant to kinking, unlike the copper tube.
We left the tube long as although you cannot see it from the image just above, the fitting on the pressure switch is just above and to the left of the fitting coming out of the tank check valve, and a straight tube connection between the two would likely have imparted a great sideload on the tube, possibly leading to a leak.
Now, we know that the air that flows from the pump into the tank can get very hot. And we are aware that the fitting into which the polyurethane tube is inserted on the tank check valve may get hot. If it does, we’ll have to find some high-heat plastic 1/4″ tubing.
It’s out there, but we’re not going to chase it down unless we have to, as our compressor use is sporadic and usually for a short duration, so we suspect that heat will not be an issue for the now plastic unloader tube.
Well, so far we’ve disassembled the old switch, added the unloader valve fitting to the new switch, threaded the new switch onto the tank nipple, and then connected the unloader valve line.
Reconnecting the Wires
Next in replacing a pressure switch hit-parade is to reconnect the wires.
As you will know from reading the instructions so far, there are two sets of wires that need to be connected to the switch. One set comes in from the power cord and the other is from the motor. On this air compressor, each set of wires has one black, one white, and one green. Here’s how we’ve hooked them up on the pressure switch.
In the image below this pressure switch has a ground screw on both sides, one for each green ground wire.
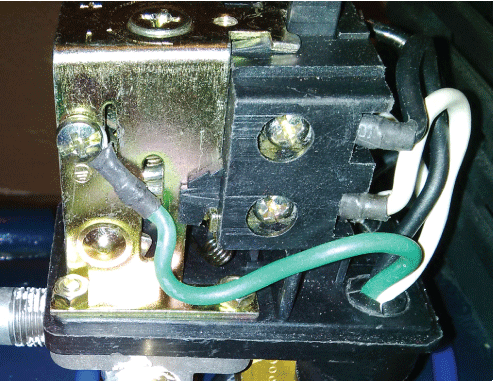
You can see we have attached one of the green ground wires to the ground screw. It doesn’t matter which side you attach to the ground, as long as all ground wires are attached to one of them. Have a look underneath the ground screw and you can see an image that looks a bit like this:

That’s the electrical symbol for ground or earth, and when you see it on an electrical device it indicates that this is where ground wires should be attached.
On the right of the image above you can see a black wire and a white wire attached to terminals on this side of the pressure switch. On the other side, the black wire is attached to the top terminal and the white wire is attached to the bottom terminal as well.
On this pressure switch, the switch innards move up and down as the switch works, alternatively making a circuit with the two black wires or the two white ones, depending on whether the switch is tripped or not.
Caution: Your pressure switch may not work the same way. Look for terminal markings that will indicate where the wires go, and ensure that when the switch wiring is installed, it’s the two black wires and two white wires that are connected alternatively as the switch operates.
One of the things we like about the pressure switch we bought as a replacement is what you see in the next image. On the top of the switch, there is a large Phillips screw. Turning it one way increases the cut in and cut out pressures, and turning it the other reduces it. When we installed the switch we dialed it down a bit to see the effect. Works well. A neat feature that we think all pressure switches should have.
OK, we’ve got the pressure switch on the tank mount, the unloader valve hooked up, and now we’ve got the wiring done. Time to add the rest of the accessories.
In this next image, the switch has been covered, all accessories including the pressure relief valve (on the other side of the switch), the tank pressure gauge, and the discharge pipe through the regulator and onto the discharge coupler have been installed.
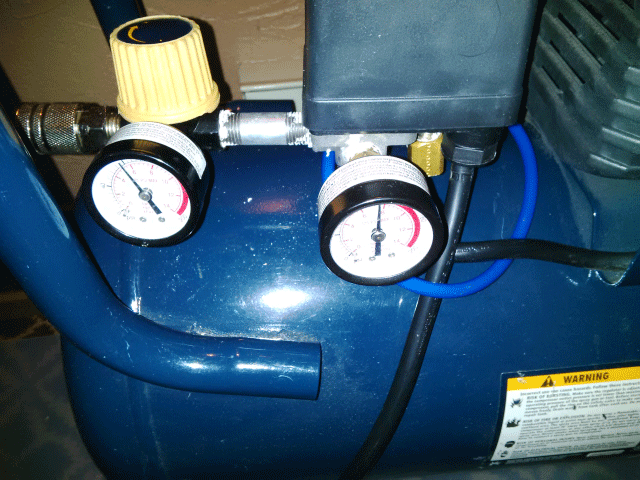
After reassembly, we have started up the compressor. See the tank gauge on the right. That’s the pressure setting where the switch tripped off, and the compressor shut down.
Success!
Varying YouTube Demonstrations
I have picked out a few YouTube demonstrations, that may use slightly different approaches than the one described in this article!
If you have any questions about this procedure? Please leave them in the comment box below.


Just need the plastic cover. Broke at the screw mount
Thanks for your good instructions for replacing the pressure switch on my compressor. My only problem is that I cannot work out how to remove the cover on the old pressure switch to access the connections for releasing the wires for transferring them to the new pressure switch. I tried every which way to get the black cover off to expose the wire connections, but it would not budge. I suppose I could break it open, as I will be replacing the whole unit.
Please assist if you can
Thank you
Odd that, David. No recessed nut on top, no edge locks where the cover extends past the base, nothing? Wish we could see that. In any case, you are right, since you are replacing the whole switch, have at the cover and see what you can see when you dislodge it. Just don’t cut any wires until you see what’s what.
Hi, I was about to order a pressure switch on eBay and was wondering what you recommend using on the thread when screwing it onto the actual tank? I’ve been told not to use the white plumbers tape but to instead use a ‘High Strength Threadlocker’ type adhesive, or even ‘Locktite 242 blue’? Does it really matter? I’m from Australia by the way, your site is very helpful, thanks so much!
Anthony, the reason that tape sealant isn’t generally recommended for sealing threads on air fittings etc. is not because it doesn’t work, but we think it’s because folks can be a bit careless when they install it. If the tape is threaded onto the fitting in the direction that the thread is turned into the air port, the tape will stay on the thread. If careless in installing thread sealing tape, and a bit of that tape gets into the air stream, it can block air paths in any devices the bit of tape is blown into. If a paste sealant is used, and care is taken with its use, once it sets up, it can no longer be blown into the air stream.
Thread sealant tape really doesn’t, in our opinion, provide sealing properties. The tape acts like a thread lubricant, allowing the fitting to be turned further into or onto a mating thread, developing greater thread to thread contact than would be achieved without using the tape, and a more air tight result.
Thanks for your kind comment.
As far as we are concerned, use any method you wish. Just be sure nothing can get into the air stream to foul up downstream equipment.
My last compressor cost me $163.00 for a replacement switch and fitting (Aus) with this info from this page i bought 1 for on Ebay for $16.00 and fitted myself, works great Thank You. B.B.
You are most welcome, Bob. We are glad the site is helpful.